Failed Ultraflex Boat Steering Cable
Posted October 14th 2018
The steering on my boat failed without warning while planing at 20 knots in choppy seas. The failure happened when the wire inside the Ultraflex M66 steering cable broke. The cable was 13 years old, it's been used in the (brackish) Baltic sea.
Dangar Marine has a nice video which shows how to replace a similar cable.
How it works
The steering cable consists of several layers. Innermost, it's a multi-strand steel cable, probably stainless, about 6mm. Next, there's a spiral-wound single-strand wire which goes all the way along the wire. Outermost, there's a black wire-reinforced plastic tube.
The steering wheel at the helm uses cogs to grip the spiral wound around the innermost cable, allowing it to both push and pull the engine sideways. Pushing steers to starboard, pulling to port.
What failed
After replacing the cable with a new one, I chopped the end of the old cable where it goes through the engine bracket. Inside, it's obvious that the inner wire failed where it's pressed into the rod which connects to the engine.
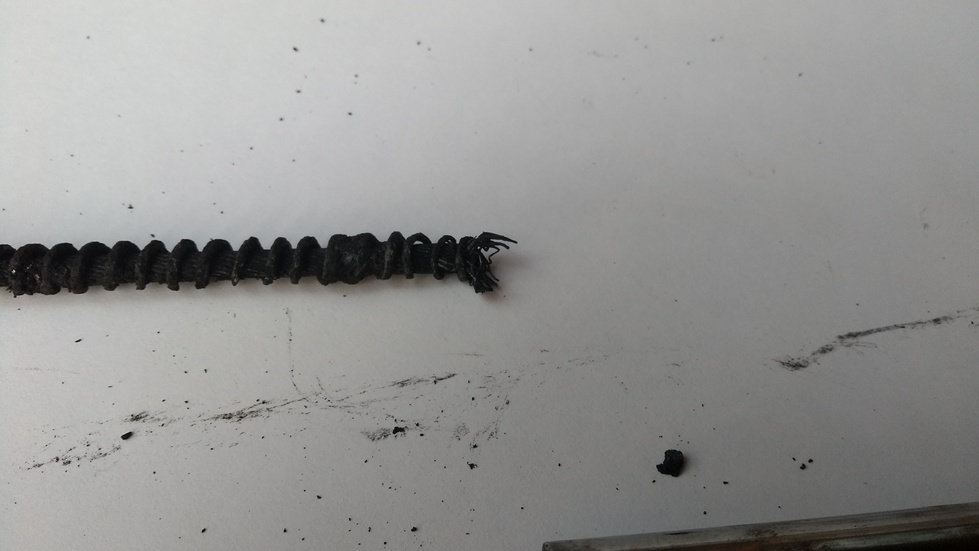
It looks like some moisture got in there over the years, in spite of the sliding coaxial tubes being regularly greased and having an o-ring designed to prevent water from getting in. The water ate away the end of the spiral, where the cable is press-fitted into the stainless rod which goes through the engine tilt tube. Every time I steered to starboard, this caused the inner cable to bulge outwards, bending the strands until they failed by fatigue.
How to replace the cable
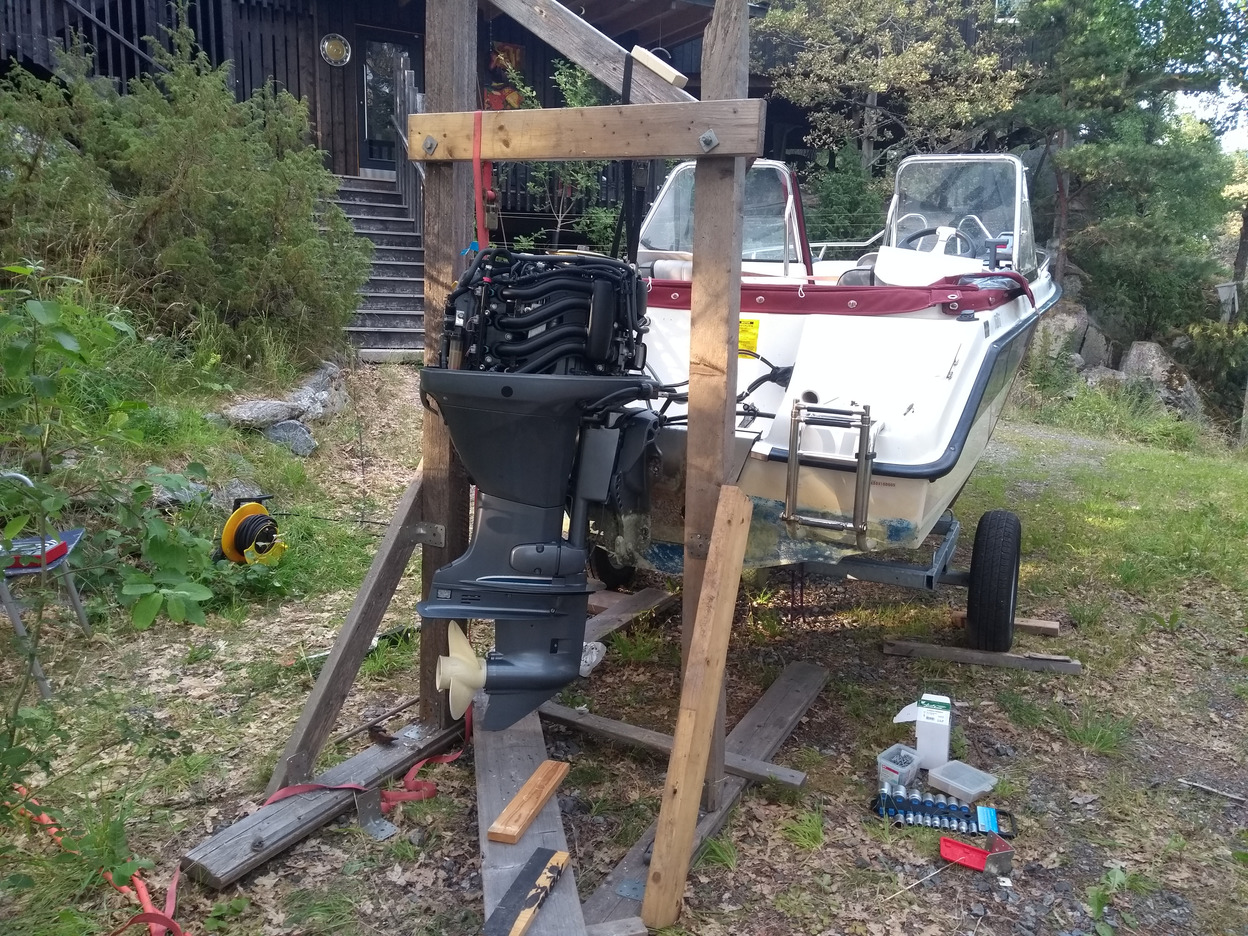
On my boat, the engine has to be lifted off to make enough space to remove the steering rod and permanently attached cable from the engine's tilt tube. A Yamaha F60CET weighs about 110 kg, so it's easy to lift if you have a workshop crane. I built a wooden gantry and used ratchet straps as well as tilting the boat trailer.
Once the old steering cable was free from the engine and helm, I taped a pulling wire to it and pulled it out backwards, i.e. out by the engine and then used the pulling wire to pull the new cable in. Remember to pass it through the hull grommet, otherwise you get to pull it in twice like I did.
Could I have avoided this failure by better maintenance?
I don't think so, short of replacing the cable regularly. The visible parts of the cable at the engine are all stainless steel, so they all looked fine. The steering didn't feel heavy. I greased the exposed parts every season, though perhaps previous owners didn't. The cable can't be disassembled, you have to cut it open to see the rust.
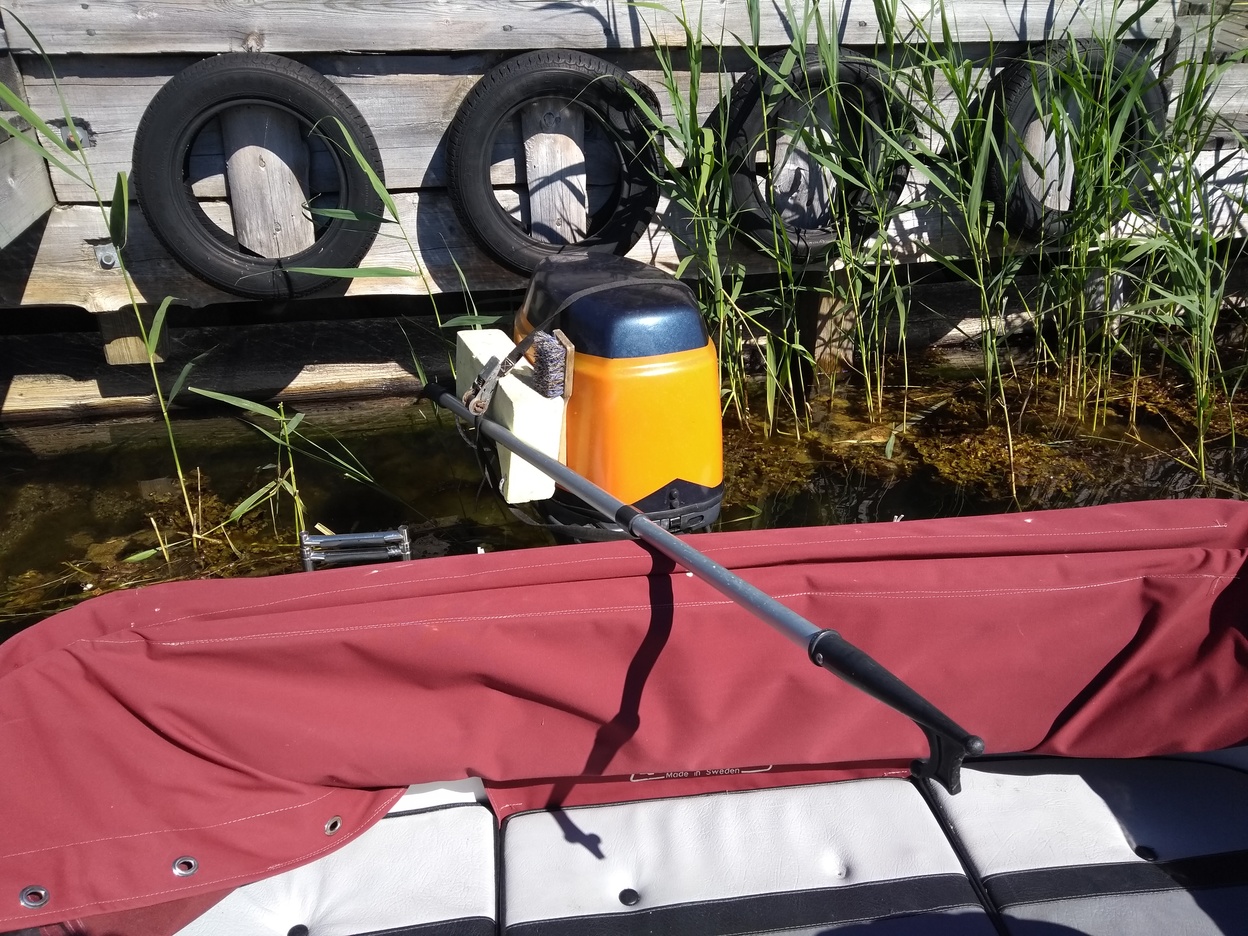
The failure came as a complete surprise: I changed course to steer into a wave and the steering wheel just spun freely. I was probably lucky the boat didn't turn hard. I got home by first puttering along at three knots and steering the engine by pushing and pulling on the cover and then, once out of the sea lane, I jury-rigged a tiller.
Getting my Seagate NAS to mount again (CIFS/SMB v 1.0)
Posted November 17th 2017
About a month ago, my Seagate GoFlex NAS failed to mount. The problem was that linux kernel 4.13 changed the default protocol version to one which the NAS doesn't support. Solution is to add 'vers=1.0' to the options in fstab.
Symptoms
My NAS didn't mount on reboot after a Debian upgrade about a month ago. Mounting manually got me a pretty useless error message:
  # mount -t cifs "//192.168.1.3/GoFlex Home Backup" /mnt --verbose -o username=XXXXXX -o password=XXXXXXX
mount.cifs kernel mount options: ip=192.168.1.3,unc=\\192.168.1.3\GoFlex Home Backup,user=XXXXX,pass=********
mount error(112): Host is down
Refer to the mount.cifs(8) manual page (e.g. man mount.cifs)
Actual problem
The actual problem is that the kernel now uses SMB protocol version 3.0 by default. The man page, MOUNT.CIFS(8) claims the opposite, but it's dated 2010, so not very surprising.
Fix
Add the 'vers=1.0' option, either via -o or in /etc/fstab
Maybe a better fix
A longer term fix would be to run better NAS software on the GoFlex, something that could talk SMB 3.0. Seagate's software isn't great, it wants flash (!) for the HTTP config interface and I haven't been able to update the firmware for several years.
OpenStora looks like it could work. The SSH login instructions on that page worked fine, I can see the GoFlex is running a kernel from 2010.
Firewall rules for OpenWRT to allow access to HTTPS
Posted September 18th 2017
I have an HTTPS server behind an OpenWRT access point. I allow access to a couple of IP addresses on the outside. I also want to allow access from all machines on the inside, i.e. 192.168.1.x.
The obvious solution (which doesn't work well)
The straightforward solution is to point the browser directly at the intranet, e.g. https://192.168.1.55. That works, but the browser is unhappy about the certificate being for a different address.
Opening up a hole with OpenWRT's firewall config
I tried various ways to explain what I wanted to OpenWRT via /etc/config/firewall, e.g.:
  config rule
        option name 'Allow HTTPS from inside'
        option src 'lan'
        option dest_port '443'
        option proto 'tcp'
        option target 'ACCEPT'
        option dest '*'
That doesn't work. I also tried a 'config redirect' and couldn't get that to work either. It's possible that if I fiddle for long enough, I can figure out how to get the right iptables config.
Opening a hole directly with IPtables (this works)
OpenWRT allows me to have custom iptables rules in /etc/firewall.user:
  iptables --table nat --append zone_lan_postrouting --source 192.168.1.0/8 --destination 192.168.1.3 --protocol tcp -m tcp --dport 443 --match comment --comment mml_xxx --jump SNAT --to 192.168.1.3

iptables --table nat --append zone_lan_prerouting --source 192.168.1.0/8 --destination intranet.corelatus.com --protocol tcp -m tcp --dport 443 --match comment --comment mml_xxx --jump DNAT --to-destination 192.168.1.3:443
Using 'fwknop' on OpenWRT
Posted March 15th 2017
2023 update: fwknop is broken in OpenWRT 22.03
OpenWRT 22.03 switched its firewall setup from 'iptables' to 'netfilter', but fwknop hasn't been updated, so it won't work. There are a few workarounds:
Wait for an update to fwknop. Might happen, might not. It could be done by the (OpenWRT) maintainer of the fwknop package, or by someone with an itch to scratch, or by fwknop upstream. But... the most recent activity in upstream (at cipherdyne.org) is from 2018.
Hack around the limitation. Some posts to OpenWRT forums suggest using some netfilter/iptables compatibility modules, but this doesn't seem to work for most people. Another possibility is to use external scripts to update the firewall rules. All of these approaches seem pretty flaky.
Run 'fwknop' on a server instead of a firewall. This is what I ended up doing.
On the (debian) server, I did a bunch of things:
- Installed fwknop-server.
- Added iptables rules to drop connections by default:
sudo iptables -A INPUT -i eth0 -p tcp --dport 22 -j DROP sudo iptables -A INPUT -i eth0 -p tcp --dport 22 -m conntrack --ctstate ESTABLISHED,RELATED -j ACCEPT - Installed iptables-persistent, so that the above rules survive reboot.
- Edited /etc/fwknop/access.conf, in the usual way.
- Started fwknop, i.e.
        sudo systemctl enable fwknop-server
        sudo systemctl start fwknop-server
After doing all that, fwknopd should be running, and it should log things to syslog.
On the OpenWRT firewall, I uninstalled fwknop and opened ordinary port forwarding to the debian server, of UDP/62201 and TCP/22. The first is so that fwknop packets get through. The second is the the service I actually want, i.e. SSH.
Original post (2017)
I use fwknop to limit network access to a server behind an TP-Link Archer C7 running OpenWRT. Configuring 'fwknop' was fiddly, so I've written down how I got it working.
TP-Link Archer C7
I chose the Archer C7 v2.0 because it's listed as working by OpenWRT, it has four GbE ports and a reasonably fast CPU, it's popular and relatively cheap.
OpenWRT
I like OpenWRT, mostly because it lets me SSH in to the access point and run things like 'tcpdump'. Installing on the Archer C7 was not straightforward. Installing the 15.05.1 firmware linked from openwrt.org left me with a device which didn't even answer 'ping'. Fortunately, there's a 'recovery mode' which re-flashes the device over TFTP. Flashing bleeding edge (50104) 'trunk' OpenWRT firmware fixed it. Instructions are easily googled, so I won't link them.
fwknop: what's the idea?
I have an SSH and HTTPS server I want to access remotely. But I don't like having apache (HTTPS) open to the internet, partly because any configuration mistakes are likely to be exploited in no time and partly because of possible unpatched vulnerabilities.
Limiting port-forwarding in OpenWRT to certain IP addresses would improve the situation, but I don't want to do that manually. 'fwknop' automates that.
'fwknop' works by having a daemon listen to UDP port 66201 on a firewall. You can see it on the firewall by running 'ps'. When it sees an UDP packet with the right credentials, it runs 'iptables' commands on the firewall to open up access for a specific host on the outside.
Installing fwknop
Update 2018-10: Easiest way is 'opkg install luci-app-fwknopd'.
There's a fwknop package for OpenWRT, so 'opkg install
fwknop' does it. Unfortunately, it didn't install cleanly,
the post-install script bombed out. Maybe because of that
the LUCI interface didn't seem to work. In any case, I
wanted to understand exactly what I was doing, so I
configured it manually.
.fwknoprc (for my home PC):
  [tegner]
  ACCESS                      tcp/443
  NAT_ACCESS                  10.1.2.3:443
  SPA_SERVER                  my.firewall.hostname.com
  KEY_BASE64                  /* secret */
  HMAC_KEY_BASE64             /* secret */
  USE_HMAC                    Y
  RESOLVE_IP_HTTPS            Y
  WGET_CMD                    /usr/bin/wget
'/etc/fwknop/fwknopd.conf' on the firewall required one change:
ENABLE_IPT_FORWARDING Y;
'/etc/fwknop/access.conf' had me confused for a while. First, I didn't realise that 'stanzas' have to go all together down the bottom, i.e. each 'stanza' starts with the SOURCE setting and then other settings. Second, I needed the 'FORCE_NAT' option, which isn't documented in the config file 'opkg' installs. In the end my 'stanza' looked like this:
  SOURCE              ANY
  OPEN_PORTS          tcp/443
  REQUIRE_SOURCE_ADDRESS    Y
  FW_ACCESS_TIMEOUT   500000
  FORCE_NAT           10.1.2.3 443
  KEY_BASE64          /* secret */
  HMAC_KEY_BASE64     /* secret */
The 'FORCE_NAT' setting is a bit weird. I initially wanted to use a 'DESTINATION' setting to limit forwarding to one host, but that seemed to cause fwknop to reject all requests. FORCE_NAT seems to ignore the IP address in the request and send to the specified one. Close enough to what I want.
'fwknop' sends quite a bit of useful debugging information to the log, use 'logread -f' to watch it.
Watermarking a PDF with ghostscript
Posted December 7th 2016
Transforming an existing PDF so that it gets something like 'Draft' stamped across each page is surprisingly easy with ghostscript. Shell script:
#!
# Add a watermark to a PDF file
#
# first argument: the filename
# second argument: the watermark text (default "watermark")

filename=$1
watermark=$2

if [ x$2 == x ]; then watermark="watermark"; fi

cat > /tmp/watermark.ps << HERE
<<
   /EndPage
   {
     2 eq { pop false }
     {
         gsave
         0.5 .setopacityalpha
         /Helvetica_Bold 120 selectfont
         .65 setgray 130 70 moveto 50 rotate ($watermark) show
         grestore
         true
     } ifelse
   } bind
>> setpagedevice
HERE

gs -dBATCH -dNOPAUSE -q -sDEVICE=pdfwrite -sOutputFile=watermarked_$filename /tmp/watermark.ps $filename
There are three tricks above. First, you have to know about the 'EndPage' hook in postscript. It's code executed at the end of each page. Second, you have to know that the parameter can be 0, 1 or 2, depending on the reason for the 'EndPage'. The postscript reference manual explains what the codes mean, but we're interested in all but 2. Third, there's the '.setopacityalpha' operator, which I think only works in PostScript 1.4, but that's OK because that's pretty standard now.
(The temporary file is ugly. Sorry.)
OpenWrt on a TP-Link TL-WR1043N/ND v3
Posted December 5th 2016
Getting this to work was surprisingly rough. I ran into trouble with OpenWrt versions, broken old config and interface name confusion. But it's nice now that it works.
Firmware update
The current (2016-12) stable version of OpenWrt is "Chaos Calmber 15.05.1". That version has support for v1 and v2 of my access point, but not v3. According to one page I found, you can hack (by editing one byte) the v2 image to install it on a v3 device, but that seemed too risky. I installed a daily snapshot from a few days back instead.
I did the install via the CLI, using 'scp' to copy the file to /tmp and 'sysupgrade' to do the install.
LUCI
Snapshots don't include LUCI, the browser UI. So I installed that with 'opkg update' and 'opkg install luci'.
Old/Broken settings
Both before and after upgrading, the wired interfaces on the access point worked fine but the wireless was 'disabled' no matter what I did. I couldn't figure out what was wrong and ended up re-installing the firmware via LUCI and unchecking the 'retain settings' box. After that, wireless worked.
Guest wireless
Mostly for fun, I set up an unencrypted guest network alongside my regular network. I did that entirely in LUCI. I put it in its own network, 'guest_nw'. To get that talking to the outside world, I had to add forwarding to the 'wan'.
I also installed 'SQM QOS', i.e. 'opkg install ...' and limited the bandwidth for the guest network. It's a bit tricky to figure out which 'interface name' relates to which wireless network, in my case it was 'wlan0-1'.
Adjusting the external monitor backlight
Posted November 30th 2016
  sudo apt-get install i2c-tools
  sudo modprobe i2c-dev
  ddccontrol dev:/dev/i2c-7 -r 0x10 -w 15
'i2cdetect -l' is useful for finding if there is an I2C adaptor. The register number, 0x10, can be read out by running 'ddccontrol' without arguments.
Addendum: to make the above work without 'sudo' and without having the manually load a module:
  sudo adduser <username> i2c
    sudo /bin/sh -c 'echo i2c-dev >> /etc/modules'
Fixing video tearing in X (and a glance at Wayland)
Posted November 21st 2016
I've used pretty much the same X setup since 1993. I'm happy with it. I want minimal window decorations, no click to focus and alt+tab to get me a new xterm and three virtual desktops. I don't want menus, status bars, clocks, animated window movement or anything like that.
But... one thing was annoying me. When scrolling some sites, such as stack overflow, the browser window gets a diagonal tear in it. It's easiest to see in video, wikipedia has a reasonable article with pictures. Fixing this should be easy: redraw the screen during the vertical blanking interval. That's not a new idea, even the Commodore 64 had an interrupt you could trigger when a particular scanline was passed.
The fix I ended up using was to create /etc/X11/xorg.conf with the TearFree option set:
  # 2016-11-21 Debian default Xorg install doesn't have this file.
  #            MML added it to get the TearFree option.
  Section "Device"
  Identifier "Intel inbuilt graphics"
  Driver "intel"
  Option "TearFree" "true"
  EndSection
Fixes the problem completely. But... before I did that, I also tried a few other fixes.
First, I tried switching to 'Wayland'. Wayland is a replacement for X. I've been meaning to take a look at it for a while. It's in Debian testing, so all I did is install 'weston', shut down X and start 'weston-launch'. That works fine in the sense that it gets me a display and I can start a terminal in it. But nothing else works. No emacs outside the terminal, no firefox, no mplayer. I could probably get some or all of those to work with some more fiddling, but I'm not that interested. I'll probably take another look at Wayland in a year.
Next, I tried running 'compton', which basically does the same thing as the TearFree option in the X server, but at a higher level. Compton changed the colour of my root window, but didn't fix the tearing. I tried the --dbe option and each of the five --vsync options. Didn't work. It also seemed to freeze up twice, getting my machine back required 'kill -9' from a console, so I gave on on 'compton' fairly quickly.
Finally, I tried the 'xfce4' window manager. It has a non-default option to do compositing, which is again basically the same thing as the TearFree option in the X server. It's in Manager/window manager tweaks/compositor/ Works fine, but I didn't really want to switch window managers. I'm perfectly happy with openbox.
Using a 'bash' function to silence GTK 3.20
Posted October 5th 2016
Emacs and mutt started spewing warnings in my xterms a month or two ago. They look like this:
(emacs:7719): Gtk-WARNING **: GtkWindow 0xd32290 is drawn without a current allocation. This should not happen.

(emacs:7719): Gtk-WARNING **: GtkWindow 0xd32290 is drawn without a current allocation. This should not happen.

(emacs:7719): Gtk-WARNING **: EmacsFixed 0xd36130 is drawn without a current allocation. This should not happen.

(emacs:7719): Gtk-WARNING **: EmacsFixed 0xd36130 is drawn without a current allocation. This should not happen.
The warnings annoy me. They're not relevant to what I'm doing; they're a GTK problem or an emacs problem. I silenced the warnings by adding this to my .bashrc:
# 2016-10. GTK has an annoying new warning which causes emacs and lots
# of other X program to spew things like "GtkWindow 0xd34290 is drawn..."
# on stderr. So we have this function which redirects emacs and mutt stderr
# to /dev/null
#
# We can remove this when GTK disable the warning again, which will
# probably happen by 2017-06.
emacs()
{
  /usr/bin/emacs $* 2>/dev/null
}

mutt()
{
  /usr/bin/mutt $* 2>/dev/null
}
This lets me type 'emacs myfile.txt' and get an emacs started which doesn't dump rubbish in my terminal.
(I could have used an alias for 'mutt', since I pretty much always run mutt without arguments. But for 'emacs' I had to use a function because I want the arguments passed.)
FWIW, here's the commit that made GTK dump debugging information to stderr by default. And here's the commit which fixed it again.
Edit 2016-11-21: underlying problem is now fixed in Debian testing, so the above workaround is no longer needed.
Having an online resume without Linkedin
Posted September 14th 2016
I've reduced my LinkedIn network to zero contacts, by hitting 'remove' on each contact. That lets me keep a LinkedIn account to view people's profiles without having to wade through bogus endorsements and easily ignore Linkedin nagging me to expand my network.
I figure I may as well just put my Linkedin profile here, since Linkedin arbitrarily hides it unless you 'upgrade your account'.
Matthias Lang
Experience
Owner
Corelatus
October 2000 – present (many years)
I am one of the four co-founders.
I write software on Corelatus' own hardware, dividing my time roughly evenly between writing for TI DSPs, C on linux and Erlang. Most of that is telecom-specific, e.g. the lower levels of SS7 and ATM and signal processing.
Engineer
Ericsson Computer Science Laboratory
Stockholm, Sweden
February 1999 – September 2000 (1 year 8 months)
Engineer
Advanced Services Application Center (joint venture Ericsson and Melbourne IT)
Melbourne, Australia
1997 – 1999 (2 years)
Formal education
University of Melbourne
B.Eng, Elec. Engineering
1992 – 1996